
How to Play Ukulele: A Step-by-Step Beginner’s Guide
 by Jonas
Learn to tune, play your first chords and keep a steady strum, then start playing “Lava” with C, F and G7.
Just picked up a ukulele and wondering where to start? I’ll walk you through holding it, tuning it, reading chord diagrams and putting your first chords into a song. You don’t need to read music or learn a pile of theory first. Keep your ukulele in your lap and try each little exercise as you go.
This lesson is for soprano, concert and tenor ukuleles in GCEA tuning. The chord shapes also work with a low-G string. A baritone normally uses DGBE tuning and needs different chord diagrams. The hand directions below describe a right-handed setup. If you play left-handed, use the “Lefthanded” switch in the chord library and follow the left-handed advice in the holding guide.
Before you start: one small goal
Your goal is to get a clear chord, keep a steady beat and play a short section of a song. That may happen in your first session or take a few sessions. Both are fine. Set aside ten or fifteen minutes and stop for a break whenever your hands need one.
You’ll need a ukulele and a tuner. Use the free UkuTabs online tuner or get my free UkuTabs tuner app for iOS or Android. The apps work offline without ads or an account. A clip-on tuner works too. A pick, capo and music stand are optional. If you haven’t bought an instrument yet, jump to choosing your first ukulele.
Already know a little? Jump to the four beginner chords, your first song or fixes for common problems. Otherwise, start here.
Step 1: Hold your ukulele comfortably
Sit comfortably with the body of the ukulele against your torso and the neck pointing slightly upward. Rest your right forearm lightly over the body. Your left hand can support the neck gently, but leave it free enough to change chords. You shouldn’t need to squeeze the instrument against you.
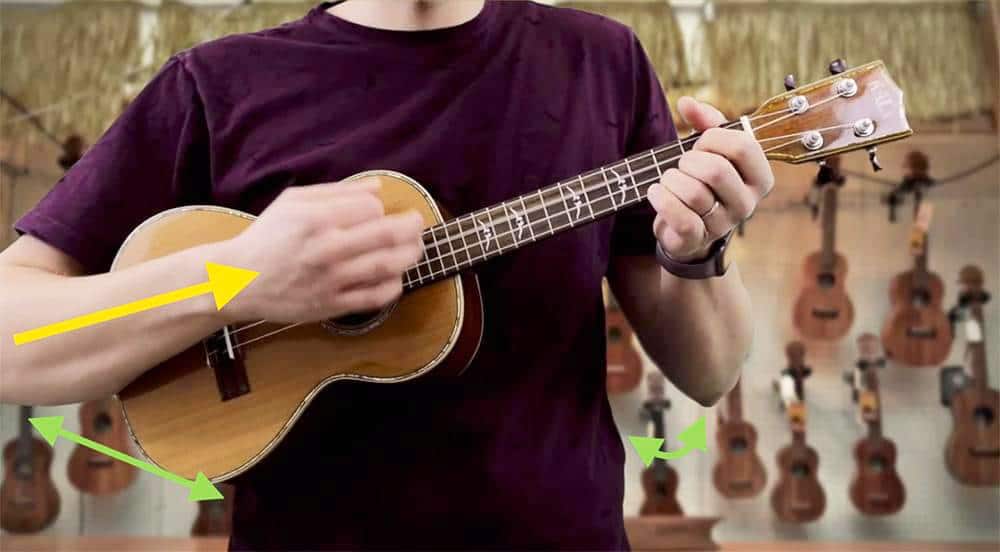
Your left hand is your fretting hand: it presses strings to make chords. Rest the thumb comfortably behind the neck and curl your fingers so the fingertips can reach the strings. Your right hand is your strumming hand: it brushes across them. Keep your shoulders relaxed and avoid sharply bending either wrist.
Five useful names before you go further: the headstock holds the tuning pegs, the nut is the small bar at the start of the fretboard, the frets are the metal strips across the neck, the sound hole is the opening in the body and the bridge anchors the strings on the body.
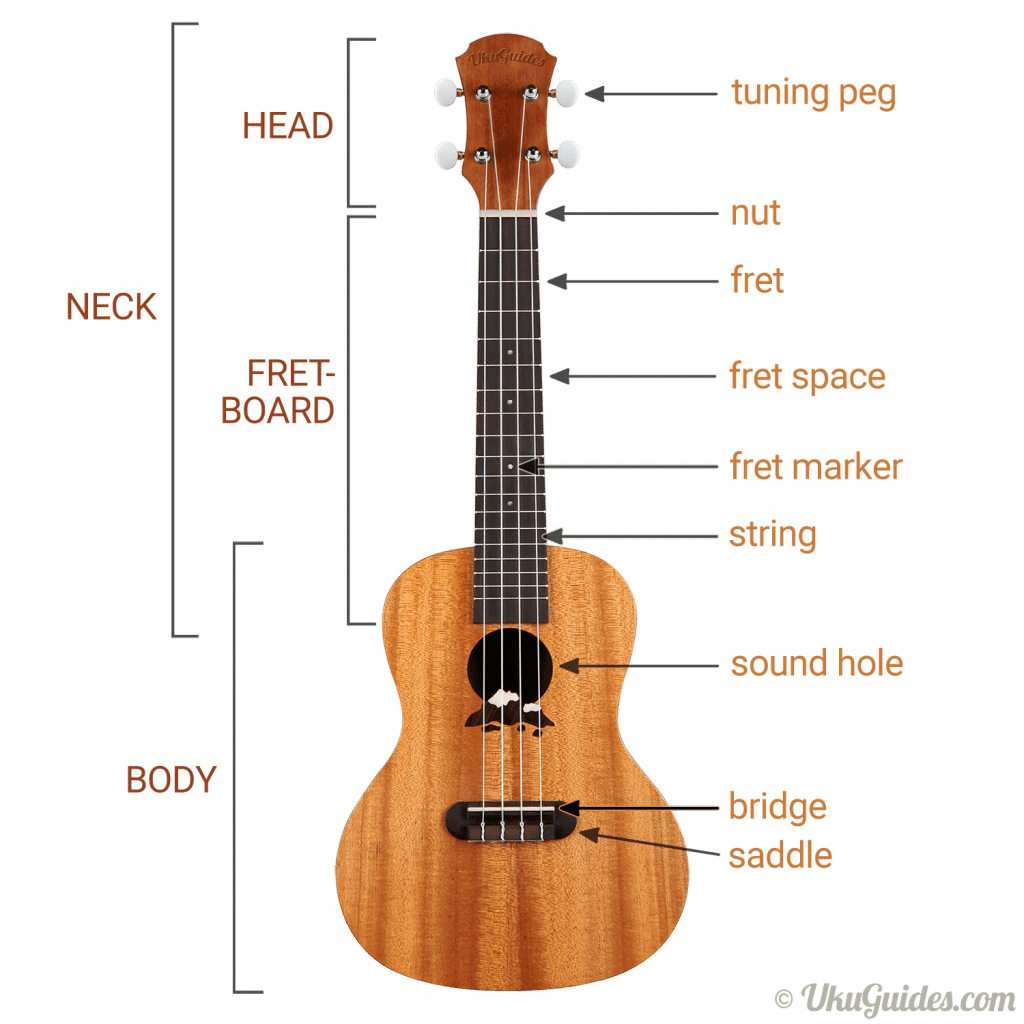
Try it: move your fretting fingers a little without clamping the neck. If the ukulele slides around, adjust its position or use a strap. You don’t have to balance it without any help from your fretting hand. The guide to holding a ukulele has more positions to try, including left-handed playing.
Step 2: Tune your ukulele to G, C, E and A
Tune before each practice session. Otherwise, a perfectly good chord shape can sound wrong. In playing position, the string nearest your face is G and the string nearest the floor is A. The strings are numbered in the opposite direction, so A is string 1.
| Position | String number | Tune to |
|---|---|---|
| Nearest your face | 4 | G |
| Next string down | 3 | C |
| Next string down | 2 | E |
| Nearest the floor | 1 | A |
Follow each string to its matching tuning peg in the picture below. This is a front view turned sideways, so A appears at the top of the picture and G at the bottom. In your playing position, G is still nearest your face.
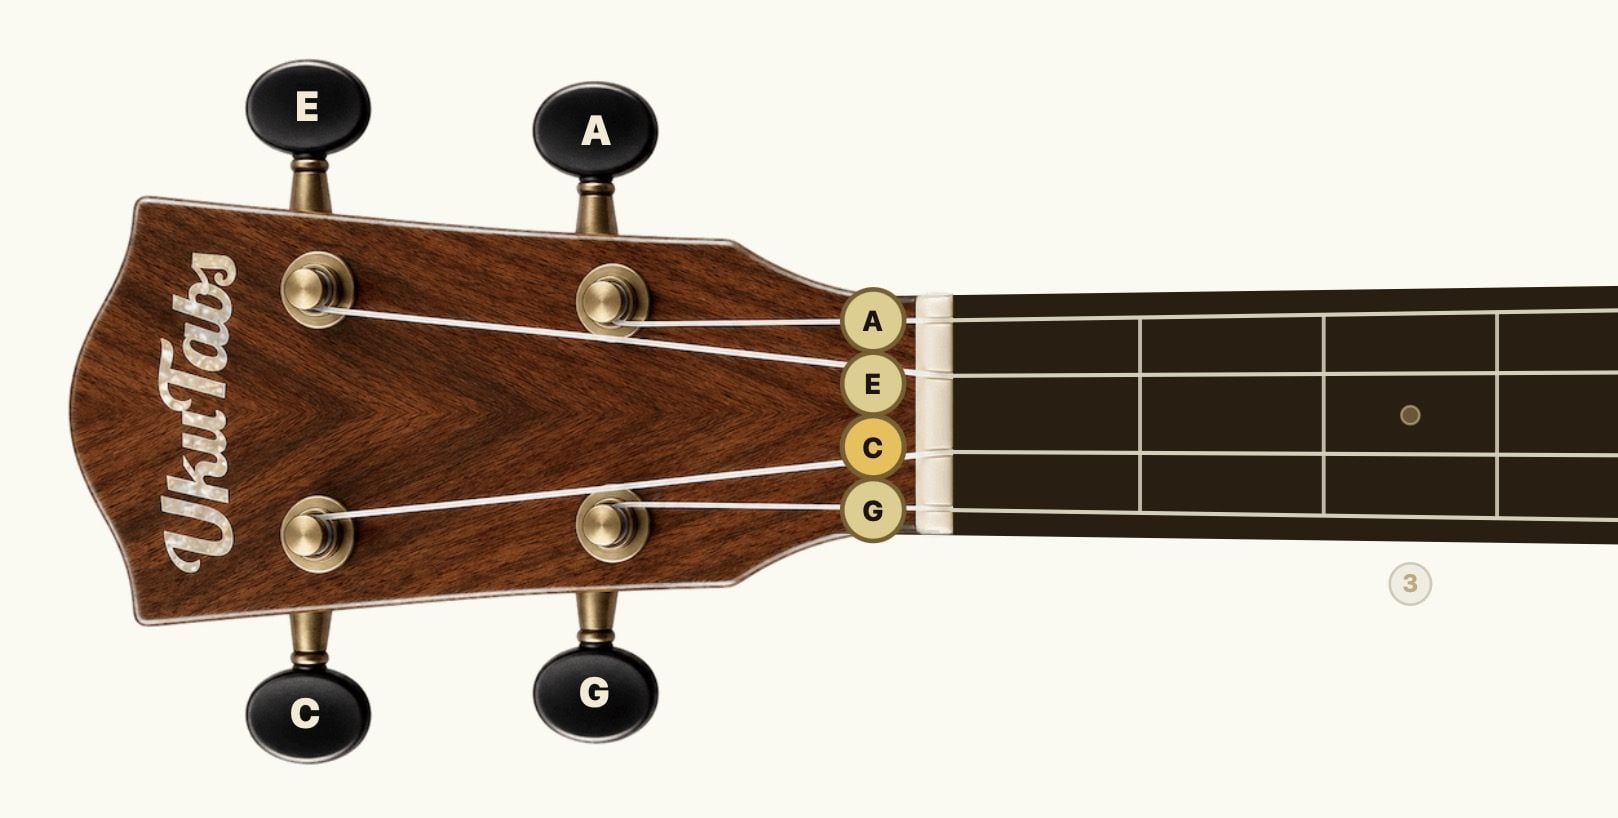
Remember Goats Can Eat Anything. Most soprano and concert ukuleles use a high G, so the pitch doesn’t simply climb from the top string to the bottom. C is the lowest-sounding string in standard high-G tuning. A properly fitted low-G string sounds lower than C and uses the same chord shapes.
If your tuner shows octave numbers, the standard targets are G4, C4, E4 and A4. A low-G string uses G3 instead. Those numbers identify pitches, not string numbers.
- Open the tuner, choose standard GCEA tuning and allow microphone access if you’re using the microphone mode.
- Pluck just one open string, without pressing a fret. Check that the tuner is showing the correct target note, not merely a centered needle on a different note.
- Follow that string to its tuning peg. Turn it a little, then pluck again. Tightening raises the pitch; loosening lowers it. The direction you turn depends on how the string is wound.
- Bring the correct note into tune, then repeat for the other three strings. Check all four once more when you’re done.
If the pitch rises much higher than the reference tone or the string feels unusually tight, stop and check the target. Don’t keep tightening just to make a letter appear. New strings can need frequent retuning as they settle.
Ready to move on? Each open string matches its target note. If the microphone struggles, use the tuner’s reference tones or a clip-on tuner. The full ukulele tuning guide explains the alternatives.
Step 3: Read a chord diagram and play C
A chord is several notes played together. A chord diagram shows where to press the strings to make those notes. Imagine the ukulele standing upright in front of you with its strings facing you.
- The four vertical lines are G, C, E and A from left to right in a standard right-handed diagram.
- The thick line at the top is the nut. The spaces below it are the first fret, second fret and so on.
- A dot shows where to press. Finger numbers are 1 = index, 2 = middle, 3 = ring and 4 = pinky.
- An open circle means let that string ring without pressing it. An X means leave that string out.
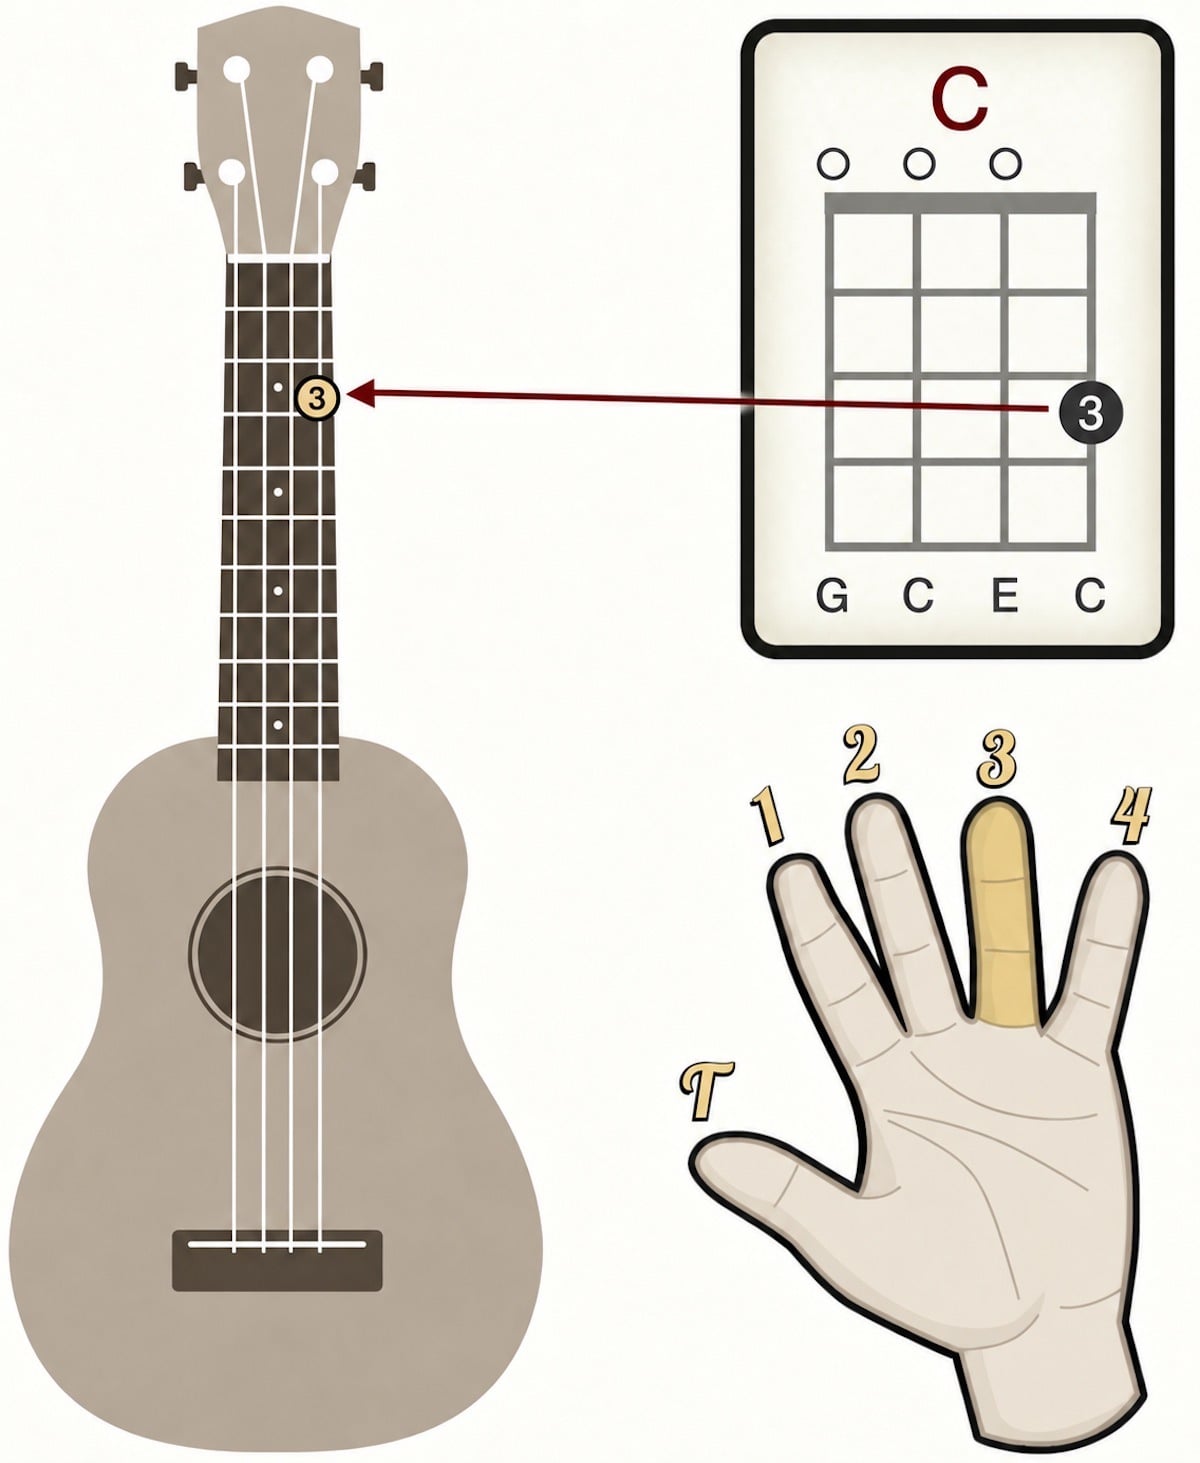
To play C major, put your ring finger on the A string at the third fret. Leave G, C and E open. Place your fingertip in the space between the second and third fret wires, close to the third wire on the headstock side. Don’t press directly on the metal.
Brush your thumb gently down across all four strings. Then pluck them one at a time. You want four clear notes. If the A string buzzes, move your fingertip closer to the third fret wire and press only as firmly as needed. If the E string is muffled, curl your ring finger a little more so it doesn’t touch that neighboring string.
You may also see C written as 0003. Those four digits give the frets on G, C, E and A in that order. A zero means an open string; the digits are fret numbers, not finger numbers. More examples are in how to read ukulele chord diagrams.
The letters beneath these diagrams name the notes you hear in the chord. That’s why the A string is labeled C when you press it at the third fret. The string itself is still called the A string.
Want to get to a song sooner? Practice C with the steady down-strum, then learn F and follow the “Lava” walkthrough, which adds G7. Come back to Am and G afterward.
Step 4: Learn four useful beginner chords
C, Am, F and G are a useful first group because you’ll meet them in lots of songs. Am means A minor. Learn one shape at a time and check every string before adding the next. You don’t need to memorize all four in one sitting.
| Chord | Where your fingers go | Frets: G C E A |
|---|---|---|
| C | Ring finger: A string, fret 3. Other strings open. | 0 0 0 3 |
| Am | Middle finger: G string, fret 2. Other strings open. | 2 0 0 0 |
| F | Middle finger: G string, fret 2. Index finger: E string, fret 1. C and A open. | 2 0 1 0 |
| G | Index finger: C string, fret 2. Middle finger: A string, fret 2. Ring finger: E string, fret 3. G string open. | 0 2 3 2 |
Start by changing from C to Am: lift your ring finger from A3 and put your middle finger on G2. Reverse that move to return to C. Make each shape, pluck its strings slowly and reset.
Next, try Am to F. Keep your middle finger on G2 and add your index finger on E1. Lift just the index finger to return to Am. That middle finger is an anchor finger, which means it stays in place through the change.
G needs three fingertips in a small triangle. Place them slowly, then check that each string rings. If it feels crowded, adjust your thumb or raise the neck slightly rather than squeezing harder. Come back to it in short attempts. You can keep practicing rhythm on C while G catches up.
For extra shapes and alternatives, use the beginner chord guide or chord library. The song below uses C, F and one additional chord, G7, which I’ll explain there.
Step 5: Keep a steady strum
Hold C and make a loose, relaxed strumming hand. Brush down across the strings with the nail of your index finger. On an up-strum, use the fleshy pad of the same finger. Use a small, easy movement from your wrist and let the finger skim across the strings.
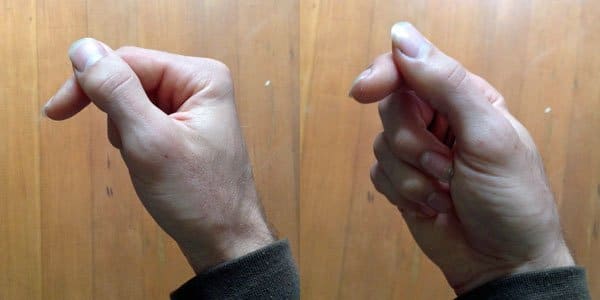
Try strumming around where the neck meets the body. Move a little toward the sound hole if that feels or sounds better on your instrument. Gentle thumb down-strums are another good way to start. You don’t need a pick, but it’s fine to use one if that’s more comfortable.

Start with four down-strums
Count “1, 2, 3, 4” out loud and strum down once on each number. Bring your hand back up between beats without touching the strings. Repeat that count four times while holding C. Each group of four beats is one bar in this exercise.
Listen for the spacing between strokes in the audio example. The player demonstrates the rhythm over C and F; you can practice the motion on C alone without trying to follow its chord changes. If you’d like a click instead, set the metronome to 60 beats per minute and play one down-strum per click. Go slower if needed.
Ready to move on? You can repeat four bars of C with evenly spaced strums. A small, quiet strum is enough. You don’t need the next pattern to play your first song.
Optional next step: the island strum
Once straight down-strums feel steady, try down, down-up, up-down-up. This is a useful pattern for many songs in 4/4 time. It isn’t the right pattern for every song.
| Count | 1 | & | 2 | & | 3 | & | 4 | & |
|---|---|---|---|---|---|---|---|---|
| Hand moves | Down | Up | Down | Up | Down | Up | Down | Up |
| Touch strings? | Yes | Miss | Yes | Yes | Miss | Yes | Yes | Yes |
Say “1 and 2 and 3 and 4 and” evenly. Miss the strings on the first “and” and on beat 3, but keep your hand moving. Practice on C alone first. The strumming guide has more patterns with audio, including patterns for other time signatures.
Step 6: Change chords without losing the beat
Making a chord and getting to it on time are different skills. If the music stops every time your fingers move, give yourself an easier version of the exercise.
- Practice the move without a beat. Hold Am, keep the middle finger down and add the index finger for F. Lift the index to return to Am. Repeat slowly a few times while watching for unnecessary finger movement.
- Add a count. Strum Am once on beat 1, count “2, 3, 4” and get ready for F on the next 1. Keep counting through the change. Repeat with F, then Am.
- Add the other strums. When the changes arrive on time, play four down-strums per bar. If your hand freezes, slow down or return to one strum per bar.
Now try this loop. Each box is one bar: hold that chord for four beats, then change on the next 1.
| Bar 1 | Bar 2 | Bar 3 | Bar 4 |
|---|---|---|---|
| C 1 2 3 4 | Am 1 2 3 4 | F 1 2 3 4 | G 1 2 3 4 |
For F to G, move your index finger from E1 to C2 and your middle finger from G2 to A2, then add your ring finger on E3. For G to C, lift the index and middle fingers and move the ring finger from E3 to A3. These changes don’t have an anchor finger.
Aim to repeat the loop twice while keeping the count going. An imperfect change is useful practice, but don’t race through a shape you can’t form yet. The guide to faster chord changes has more focused drills.
Step 7: Play your first song with “Lava”
Let’s put those skills into “Lava” from the Pixar short. The UkuTabs sheet uses just C, F and G7. If you don’t know the tune, listen to it before trying to play along. Knowing how a song goes makes the chord changes much easier to follow.
Add G7 for this song
For G7 (0212), leave the G string open. Put your index finger on E1, middle finger on C2 and ring finger on A2. Strum all four strings. G7 has an extra note compared with G; learn it as its own chord rather than treating it as a replacement for G in every song.
Try these three changes slowly before opening the sheet:
- C to F: lift the ring finger from A3, put your middle finger on G2 and your index finger on E1.
- F to G7: keep the index finger on E1, move the middle finger from G2 to C2 and add the ring finger on A2. That index finger stays put as your anchor.
- G7 to C: lift the index and middle fingers, then slide the ring finger along the A string from fret 2 to fret 3. Keep only light contact while sliding.
Practice the three chords in time
Count “1, 2, 3, 4” before starting. Play one down-strum on each beat and hold each chord for four beats. This is a chord-change exercise using the song’s chords, not the song’s actual arrangement.
| Bar 1 | Bar 2 | Bar 3 | Bar 4 |
|---|---|---|---|
| C 1 2 3 4 | F 1 2 3 4 | G7 1 2 3 4 | C 1 2 3 4 |
Repeat the loop a few times. If four strums leave too little time to move, strum just on beat 1 of each bar and let it ring while you count “2, 3, 4.” Add the other strums when the next chord arrives on time.
Now follow the “Lava” song sheet
- Open the Lava chords and lyrics. Leave the transposer at its default setting so the sheet uses C, F and G7. Listen to the chorus once and follow the chord names as you listen.
- Start with the chorus. Play one gentle down-strum whenever a new chord is written, then let it ring until the next change. Work on the first two lines before trying the whole chorus. Follow the sheet’s actual chord order.
- Add a steady pulse. Once you can find the changes, add even down-strums on the beat. A chord name above a word shows roughly where to change, but the lyrics aren’t full rhythmic notation. Listen for the timing and keep the count going.
- Build up to the full song. Learn the verse in the same way, then follow the sheet from the beginning. Play slowly and leave singing until your hands can keep going. Auto-scroll can help once you’re ready for a longer play-through.
Unlike the practice loop, the song doesn’t give every chord exactly four beats. Stay with a chord until the next written change and use the recording to hear how long it lasts. The simple down-strum accompaniment is enough while you learn the song; save the island strum for later.
If “Lava” isn’t a song you want to learn, choose one you already enjoy from the list below. The guide to playing your first ukulele song helps you pick a manageable arrangement. When using the transposer, remember that it changes every chord and the song’s key, so check the whole new chord list before you start.
Beginner songs to try next
These are the chords in the linked arrangements at their default transposition. A short chord list doesn’t always mean an easy performance: rhythm, speed and singing all add difficulty.
| Song | Chords in the sheet | Your next step |
|---|---|---|
| Lava | C, F, G7 | Practice the F to G7 change, then follow the song’s timing. |
| Ho Hey by The Lumineers | C, Am, F, G | Use the four main shapes. Start slowly before adding the song’s accents. |
| Riptide by Vance Joy | Am, G, C, Fmaj7 | Start with the Am, G and C sections. The bridge adds Fmaj7, so the full song needs one more shape. |
| Somewhere Over the Rainbow by Israel Kamakawiwoʻole | C, Em, Am, F, G, E7 | Save the complete sheet for later: it adds Em and E7, including the intro/outro. |
Find more options in the easy ukulele songs collection. Choose one you already know well enough to hum. That makes it much easier to hear when a chord should change.
Fix common beginner problems
| What happens | Try this first |
|---|---|
| Every chord sounds out of tune | Recheck all four open strings against their target notes before changing your fingering. |
| One fretted string buzzes | Move the fingertip closer to the fret wire on the headstock side. Add only enough pressure for a clear note. |
| A neighboring string sounds dead | Pluck each string separately. Curl the finger that’s leaning onto the muted string and try again. |
| The ukulele slips when you change chords | Adjust how the body rests against you or use a strap so you don’t have to grip the neck tightly. |
| Your finger catches on an up-strum | Relax it and use a shallower stroke. Brush the surface of the strings instead of digging underneath them. |
| You stop at every chord change | Slow down and play one strum per bar while counting all four beats. Add more strums once the change arrives on time. |
Give your hands frequent breaks. If your fingertips feel tender, shorten the session and check that you’re not pressing too hard. Stop if playing hurts. The guide to sore fingers goes into more detail.
A simple seven-day ukulele practice plan
Use this as a route, not a deadline. Repeat any day until it feels comfortable. A useful ten-minute session is two minutes of tuning, three minutes on one chord change, three minutes of rhythm and two minutes playing something you enjoy.
- Day 1: hold the ukulele comfortably, tune it and make C. Check that all four strings ring.
- Day 2: add Am. Practice lifting the ring finger from A3 and placing the middle finger on G2, then reversing the move. Keep four down-strums steady on C alone.
- Day 3: add F. Keep your middle finger on G2 as you add or lift the index finger on E1. Count through slow Am to F changes.
- Day 4: build G one finger at a time. Try the C, Am, F and G loop with one strum per bar.
- Day 5: learn G7. Practice F to G7 with your index finger held on E1, then try the C, F, G7 and C preparation loop.
- Day 6: listen to “Lava” and work through its chorus. Start with one down-strum at each written chord change.
- Day 7: repeat the chorus, then work on the verse. Build toward a full play-through as the changes become comfortable. Try the island strum on C alone as a separate exercise.
At the end of the week, notice one thing that’s easier: finding C, hearing an out-of-tune string or reaching the next chord on time. Keep practicing that way. You can choose the next skill from the full ukulele guides hub when you’re ready.
Choosing your first ukulele
If you already have a playable ukulele, use it. If you’re shopping, try a soprano, concert and tenor if possible. All three usually use GCEA tuning. A concert gives you a little more space between frets than a soprano; a tenor gives you more again. The best size is the one you can hold and fret comfortably.
Ask the shop to tune it and check its setup. The strings should be comfortable to press and the notes should ring without persistent buzzing. Very high string height can make learning unnecessarily hard. Synthetic strings are normal on a good ukulele and geared tuners alone don’t guarantee a good instrument.
A baritone is a valid choice too, but its usual DGBE tuning needs a different chord chart from this lesson. The size comparison and buying guide will help you choose without turning your first lesson into a shopping trip.
Frequently asked questions
Is the ukulele hard to learn?
No. It has four soft nylon strings, the first chords need one or two fingers and the neck is short enough that nothing is a stretch. Most people play a full song within their first week of short daily practice. It’s easier than guitar, and if you’re choosing between the two, the ukulele versus guitar guide goes through the differences.
Can I teach myself to play ukulele?
Yes. You can learn the basics with a tuned instrument, clear chord diagrams and regular practice. Start with one chord and a steady beat, then follow the song above. A teacher can help if you’re unsure about your technique or keep getting stuck.
What should I learn first on ukulele?
Learn to hold it comfortably and tune it, then play C with four steady down-strums. Add one new chord at a time. You don’t need advanced strumming or music theory before you play a simple song.
What are the four basic ukulele chords?
C, Am, F and G are a useful beginner set in GCEA tuning. C and Am each use one finger, F uses two and G uses three. They aren’t the only beginner chords: G7 is another useful shape, including for “Lava” in this lesson.
How long does it take to learn ukulele?
You may get a clear chord and simple accompaniment in your first session. Smooth changes, steady rhythm and singing at the same time usually need more practice. Use those milestones to judge progress rather than expecting to finish learning within a fixed number of days.
Do I need to read music or use a pick?
Neither is required for this lesson. Chord diagrams show where your fingers go and the counted bars show when to change. Fingers or a thumb work for strumming. Standard notation and tablature are useful skills you can learn later if you want to play melodies or more detailed arrangements.
Can I use a low-G or baritone ukulele?
A ukulele fitted with a low-G string still uses GCEA tuning and the chord shapes here work. A normally tuned baritone uses DGBE, so the same finger positions produce different chords. Use a baritone chord chart for that tuning.
Am I too old to learn ukulele?
You don’t need to start as a child. Choose a comfortable instrument, use short sessions and go at your own pace. A strap, a comfortable setup or a different fingering can make playing easier if holding the instrument or reaching a chord is difficult.
Play it once more
Before you put the ukulele away, return to the C, F and G7 practice loop or the chorus of “Lava.” Tune again if needed, count in and play through it slowly. Give yourself one small thing to work on next time.
I hope this guide has helped you play your first ukulele chords and put them into a song. Keep on practicing and enjoy! Feel free to contact me whenever you need more information about learning to play ukulele. Good luck and have fun!