
When you are comfortable with the (basic) chords and strumming, fingerpicking is a natural next step. It helps you add melody, rhythm and harmony to your playing. This article takes you from the basics (how and what) and simple patterns to core exercises and examples. Focussing on standard GCEA tuning, example tabs are writing in the standard ukulele format. Check out this guide on how to read tablature first if you are unsure about this format.
Why learning fingerpicking matters
Where strumming gives your playing drive and groove, fingerpicking can add depth and nuance. You can arrange solo pieces, make chord progressions more interesting and bring out melodies. Even just practicing fingerpicking can improve your timing and right-hand independence.
Right-hand setup, PIMA mapping
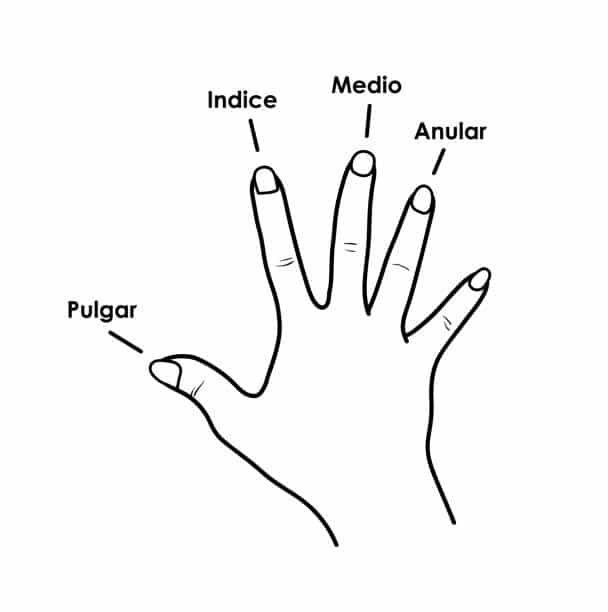
I like using the classical mapping adapted for ukulele, called the “PIMA” method. The letters are taken from the Spanish words for the fingers: P = pulgar (thumb), I = indice (index finger), M = medio (middle finger) and A = anular (ring finger).
- P (thumb): Usually the G (4th) string, often alternating to C (3rd) in some patterns.
- I (index): C (3rd) string.
- M (middle): E (2nd) string.
- A (ring): A (1st) string.
Keep the hand relaxed, fingers slightly curled and movements compact. Aim for a light, even pluck rather than hammering into the strings. Resting the hand lightly on top of the ukulele for stability is fine as long as you keep your wrist loose.
Getting Started
- Finger placement: Start with holding a simple C chord (0-0-0-3). Slowly pluck from top to bottom G–C–E–A with P–I–M–A, so one finger for each string. Try being consistent aiming for good timing. Repeat on G, Am, and F chords and start over.
- Alternating thumb: On open strings or a held chord, you can try alternating the thumb (P) between the G and C string while your index (I) or middle finger (M) adds a light off-beat note on the E or A string. This is the basis for Travis-style picking.
- Metronome routine: Start the exercise around 60 BPM with eighth notes (1 & 2 & 3 & 4 &). Only increase the speed when every note is clean and relaxed. Try going through a full cycle (C, G, Am, F).
Essential fingerpicking patterns for ukulele
Each pattern below shows one-bar pattern on a C chord (0-0-0-3), but feel free to transfer the pattern to other chords.

Pattern A: Forward Roll (P → I → M → A)
This classic arpeggio moves from the bass up to the melody: G → C → E → A. Great for building finger independence and a smooth flow. Try to get this one down before moving on.
A|-----------3-|
E|-------0-----|
C|----0--------|
G|-0-----------|
   P  I  M  A
Pattern B: Reverse Roll (A → M → I → P)
Same idea as the first pattern, but in reverse. From melody down to bass: A → E → C → G. Lovely for gentle passages and ballads.
A|--3---------|
E|----0-------|
C|-------0----|
G|----------0-|
   A  M  I  P
Pattern C: Inside-Out (I → M → P → A)
Starting in the middle strings creates a different rhythmic feel without needing speed: C → E → G → A.
A|----------3-|
E|-------0----|
C|-0----------|
G|----0-------|
   I  M  P  A
Pattern D: Travis-Style Alternating Thumb
This is one of my most favorite patterns. It is an 8th-note pattern in 4/4 timing. The thumb (P) plays the bass on the beats (G on 1 and 3, C on 2 and 4). The index (I) and middle (M) fingers add light notes on the “&” counts (E with I after 1 and 3, A with M after 2 and 4). Example again with a C chord (0-0-0-3) below.
Count: | 1 | & | 2 | & | 3 | & | 4 | & |

A|-------------3---------------3-|
E|-----0---------------0---------|
C|---------0---------------0-----|
G|-0---------------0-------------|
   P   I   P   M   P   I   P    M
Keep going on with different chords. This steady alternation is the Travis “engine”.
Pattern E: Pinches (Dual-String Accents)
You can “pinch” the strings by plucking two strings at once. This adds an extra emphasis to your pattern. The example below pinches on beats 1 and 3, with single notes around them.
A|--3-----------------3---|
E|------0------0----------|
C|---------0------0-------|
G|--0-----------------0---|
   P+A  I  M   I  M  P+A
Practice drills that work
- Two-minute rolls: Pick a chord and try looping the forward roll (pattern A) for two minutes. Take a small break for a minute and then do the reverse roll (pattern B). Small break again and follow-up with the inside-out pattern (pattern C). This aids you in achieving an even tone and timing.
- Practice using a metronome: Start slowly and go up a notch: 60 → 72 → 84 → 96 BPM. Only climb when the pattern feels effortless.
- Chord-change chain: Use C → G → Am → F. Play one bar of your chosen pattern on each chord. Change the chord and try keeping the picking hand steady. Make sure the chord changes early enough to land cleanly on beat 1.
- Skip-string control: Practice non-adjacent orders of chords (e.g., G → E → C → A) to improve accuracy.
- Hybrid loops: Combine strumming and fingerpicking. Pick a chord and strum for one bar. Follow-up with a fingerpicking pattern on the second bar and repeat. This teaches smooth transitions so you can mix picking in your playing.
Full examples:
C–G–Am–F with the Forward Roll pattern. One bar per chord, repeating the roll (P → I → M → A). Focus on evenness and clean changes.
   C (0-0-0-3)   G (0-2-3-2)   Am (2-0-0-0)   F (2-0-1-0)
A|-------3-----|-------2-----|-------0------|-------0-----|
E|-----0-------|-----3-------|-----0--------|-----1-------|
C|---0---------|---2---------|---0----------|---0---------|
G|-0-----------|-0-----------|-2------------|-2-----------|
C–G–Am–F with a Gentle Travis Feel. Keep the thumb alternating G/C on beats. Add light finger notes on the “&” counts. Don’t rush.
Chord: C
A|-------3-------3-----------3-----------|
E|-----0-------0-----------0-------------|
C|-----------0-----------0---------------|
G|-0---------------0---------------------|

Chord: G
A|-------2-------2-----------2-----------|
E|-----3-------3-----------3-------------|
C|-----------2-----------2---------------|
G|-0---------------0---------------------|

Chord: Am
A|-------0-------0-----------0-----------|
E|-----0-------0-----------0-------------|
C|-----------0-----------0---------------|
G|-2---------------2---------------------|

Chord: F
A|-------0-------0-----------0-----------|
E|-----1-------1-----------1-------------|
C|-----------0-----------0---------------|
G|-2---------------2---------------------|
Pro Tips & Common Fixes
- Slow first, then smooth, then fast: Speed is the last step, not the first. Clean motion is everything.
- Economy of movement: keep fingers close to the strings.
- Accents and dynamics: try bringing the melody string a touch forward in volume.
- Left-hand timing: switch chords a hair early so the first picked note of the new bar is always clean.
- Record yourself: small timing wobbles are easier to hear than feel.
FAQ: Ukulele Fingerpicking
What is fingerpicking on the ukulele?
It’s playing individual strings on the ukulele with your thumb and fingers instead of strumming all strings together. As opposed to strumming where you hit all the strings at the same time.
Which fingers go on which strings?
Use PIMA: thumb (P) for G (and often C when alternating), index finger (I) for C, middle finger (M) for E, and ring finger (A) for A. This mapping is taken from classical guitar training and helps streamline learning.
What patterns should I learn first?
I would suggest to start with the forward roll, reverse roll and inside-out first. Then add a simple Travis-style alternating thumb and a few pinches for emphasis or even introduce chucking.
How do I practice effectively?
Short daily sessions with a metronome, slow and steady, is the way to go. Loop patterns on one chord and then add chord changes. Record yourself and only increase tempo when it feels easy.
Can I use fingerpicking on songs I already know?
Absolutely. Take any chord progression and replace strums with a roll or a Travis feel. Add pinches on strong beats to shape the groove and highlight melody notes.